If you want to convert your aging VHS to DVD in order to preserve them before they are unplayable, then you’ll be happy to hear it’s easy to convert VHS to DVD with a DVD recorder combo machine.
Who this method is good for
- Anyone that has several VHS tapes to transfer and does not want to send them to a video transfer service due to cost or other reasons
- Anyone who either doesn’t have a computer or struggles technically with computers
- Anyone that wants to watch their videos on a TV still can use the DVD recorder and DVDs now instead of the VHS tapes. The bonus is most VHS to DVD recorder combo units have a variety of video outputs including HDMI which makes connecting to a smart tv much easier.
Who may not want to transfer VHS to DVD
- you will need to buy a used VHS to DVD recorder combo from a used online marketplace like eBay, if you don’t have an eBay account or can’t get help from someone that does then this might not be for you.
- many people with a computer will instead use a video to USB converter or another capture device for their VHS tapes which allows them to store the video as files on their computer that can be edited later
- since DVDs can also wear and degrade over time, some people skip this step and go right to saving their videos on
- anyone attempting to copy a copyright-protected VHS tape – using a combo VHS to DVD recorder may or may not work, but would violate the FBI warning seen at the beginning of every movie.
What You Will Need To Convert VHS to DVD
You will need to purchase a few items before transferring your VHS tapes to DVD
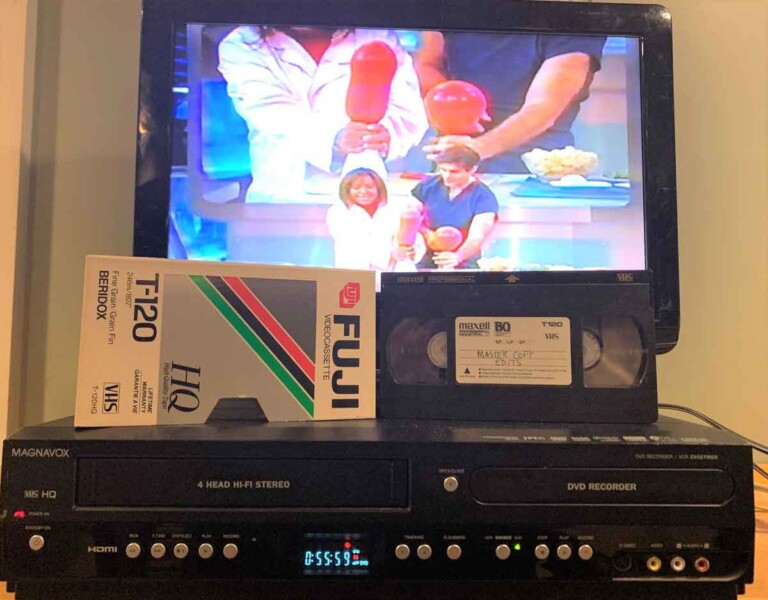
Combo VHS Player / DVD Recorder
The combo VHS Player and DVD recorder is the key piece of equipment for transferring your VHS tapes directly to DVD.
Back when DVDs gained popularity in the early 2000s many households purchased and may still have combo VHS and DVD players, these are capable of playing both VHS tapes and DVD discs. The appeal of the combo players was you could have 1 device that would playback all of your media types vs purchasing a separate DVD player.
The combo players certainly are convenient, but they are not capable of recording onto a DVD.
Where to Buy a Combo VHS Player DVD Recorder
Suppose you don’t own a combo VHS player and DVD recorder, but want to purchase one as this is one of the easiest methods of converting your decaying VHS tapes to a digital format. In that case, you will need to search online as these machines are no longer manufactured or sold in retail stores.
Your best 2 options for purchasing a combo VHS player DVD recorder combo are:
- eBay – being the world’s used marketplace it has plenty of VHS DVD recorders, many selling for under $100
- Amazon – there are plenty of VHS DVD recorders on Amazon, I found a wide price range so you’ll need to sift through the listing to find one that meets your budget.
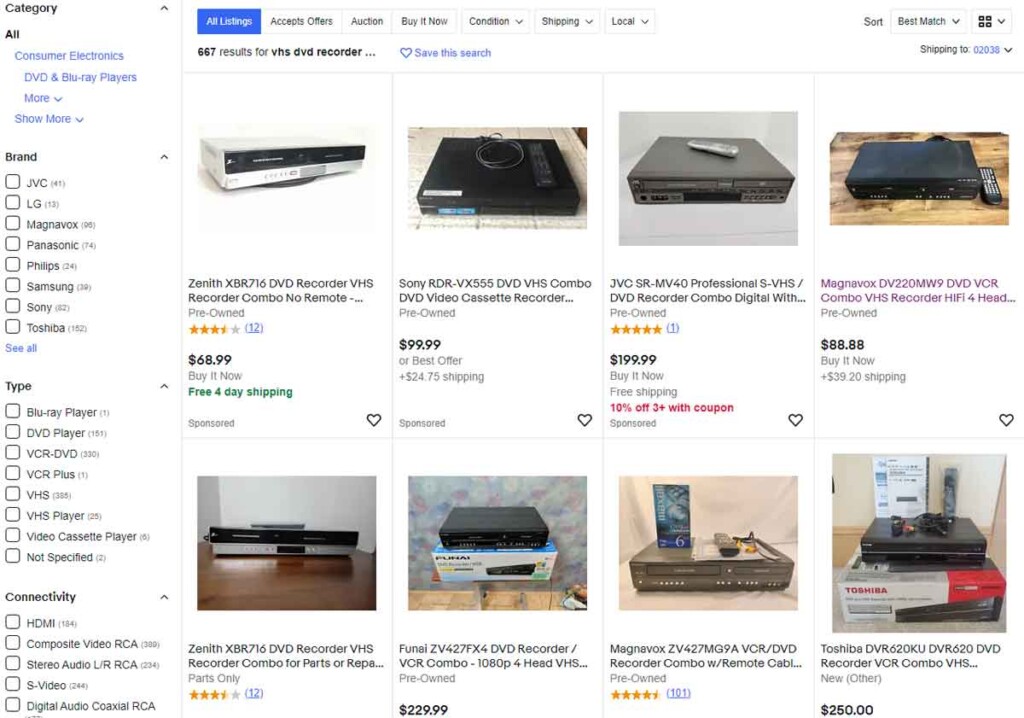
If you are looking for more selections on where to purchase a combo VHS player / DVD recorder then most of the recommendations in our article on where to buy a VHS player will also work.
VHS Player DVD Recorder Combo Must Haves:
- Recorder Not Player: Be sure that whatever you purchase says recorder and not a player as the listings might blend together.
- Remote Control – make sure it comes with the original manufacturer’s remote control. You may not need it to play and record but you will most likely need a remote to finalize the DVD, which is the final step of making it playable on other devices. Its possible a universal remote would work but I’d rather not risk it.
- User Manual – I would say before you even purchase a used VHS DVD recorder combo find out the model # and make sure you can download the user manual for it simply by searching “model + user manual”. The user manual will be your best friend when it comes to things like setting recording mode, types of DVD discs to use and finalizing discs when done recording.
Blank DVDs
Before you buy any blank DVDs, check the user manual or description of whatever DVD recorder you purchased to determine which discs you should buy. The most common are DVD-R and DVD+R, some recorders can handle both disc types, but some can not.
DVD discs can still be purchased in some retail stores like Staples, or online of course from Amazon. They usually come in packs of 25, 50, or 100 so purchase enough to convert your VHS tapes and still have a few leftovers in case of mistakes.
Personally, I like buying white discs that are meant to be printed or written on. Some printers come with software for printing a nice label for the disc, I usually just use a sharpie and write directly on it.
Printable or writable white DVD discs are really inexpensive, check Amazon
TV Connected to Combo Player/Recorder
During this transfer process, you will need a TV connected to your VHS DVD combo recorder so you can view what is being played on the VHS tapes.
Make sure your combo player recorder is connected to your TV and you should be ready to roll. You don’t need an old-style tube TV, you should be able to connect to any smart tv even with a coaxial cable.
How To Convert VHS to DVD With a DVD Recorder – Step By Step Instructions
Follow these instructions step-by-step and by the end, you will have converted your VHS to DVD.
Remove The Safety Tab From the VHS Tape
The safety tab on VHS tapes controls whether the VCR is allowed to record onto the VHS or not. By removing the tab it should stop the VCR from recording anything onto the VHS tape.

We are not trying to record onto the tape during any of the steps here, this is a safety measure to make sure we don’t record over anything on the VHS tape.
While the tab is still present or intact, which is how store-bought blank tapes arrive, you can still record on them. When you pop out or break off the tab with a screwdriver or something the VCR recognizes that it’s been removed and will no longer allow recording onto the tape.
Find Out The Length Of the Video Tape
VCRs allow you to set the recording speed of a tape, from SP for 2 hours, LP for 4 hours, and EP/SLP for 6 hours. The longer the tape generally the worse the quality.
If you want to transfer an entire VHS tape onto a single DVD then you need to find out how much video is recorded on the tape, as you will need to later adjust your DVD recording settings in order to fit the video.
To find out how much video is recorded on a VHS tape:
- insert the tape into the VHS player
- fast-forward to tape to the very end
- reset the counter to 0:00 by either hitting the reset counter on the remote or by simply ejecting the tape and re-inserting it
- rewind the tape to the beginning
- look at the counter – the minutes and seconds reported on the display will let you know how much video is on the tape.
The process will be the same for each tape you convert, but each tape will have a different amount of video so be sure to write down this number as you start a new recording session.
Rewind the Tape To The Beginning
If for some reason the videotape is not at the beginning then rewind it to the very beginning now, assuming you want to start from the beginning. Reset the counter if it’s not a 0:00 for some reason.
You don’t have to record the entire VHS if you don’t want to, I’ll discuss later how to skip sections of the tape if you don’t want to convert all of it to DVD.
But for now, let’s assume you’re going to transfer the entire VHS tape without interruptions
Insert Blank DVD
When you insert a blank disc the DVD recorder will spin and make some initial evaluation of the disc.
If for some reason you entered a disc that is not compatible with your DVD recorder then some sort of error message will pop up on the screen.
If you don’t see any error messages then you are in luck and can proceed to the next step. If you do see an error message then it’s possible the DVD discs you purchased are not compatible with your recorder, or you’ve already recorded onto the disc and it’s full.
Set the DVD Record Mode
It may not be obvious from when you inserted the DVD disc, but you can set the record mode which is the length of time and quality of video that will get recorded to the disc.
Your DVD recorder may or may not prompt you to set the record mode when you insert a new disc, it will depend on the make and model. Generally, they will default to an SP mode of 2 hours per disc.
This is similar to setting the SP/LP/SLP setting on a VHS tape, except it’s the record mode of the DVD disc. It is also why you previously found out home much video is on the VHS tape.
You want your DVD record mode to match how much video is on the VHS tape. For example, my Magnavox VHS DVD recorder has the following DVD record modes:
- HQ = 1 hour
- SP = 2 hours
- SPP 2.5 hours
- LP 3 hours
- EP 4 hours
- SLP 6 hours
So if I had a VHS tape that had 5+ hours of video on it then I would choose SLP mode for the DVD. This means it will record at a lower video quality onto the disc in order to fit all 5+ hours of video.
If I had 2 hours of video on the VHS tape I would set the DVD record mode to SP so it would record at a higher quality and use all of the free space on the disc. Had I left the record mode in SLP it would have recorded at a lower quality to leave more room on the disc for additional video.
Again, refer to your user manual and set the record mode of the DVD disc to match the length of the video on the VHS tape. You generally need your remote control to set the record mode.
Set Auto Chapters (Optional)
Most DVD recorders have an auto-chapter setting, which means it will set a chapter on the DVD disc for the time interval you set. This can be any amount of time usually every 2, 5, or 10 minutes or more depending on the model.
By setting auto-chapters it can make it easier to navigate around the DVD disc when its done recording, allowing you to quickly skip around the video at set intervals just like on a store-bought DVD.
This step is optional and would require your DVD remote and reading your instruction manual for the model in order to set it correctly. I just mention it here because it can be a useful setting and worth looking into.
Start The Dubbing Process
Once your tape is rewound, and the DVD disc inserted you are ready to start the dubbing process.
Dubbing from VHS to DVD is generally a 1 button click on the VHS / DVD recorder. It will simultaneously play the VHS tape and start recording onto the DVD disc.
You can let the dubbing process run from the start to the end of the VHS tape.
Stop When Finished
When you hit stop on the VHS player it will write some additional info to the DVD disc which can take a few minutes.
If you stopped the VHS player because the tape was done, or the footage was something you didn’t want to record onto the DVD disc like commercials, bad footage, etc that’s ok.
Generally, any time you stop the recording it will create a chapter point on the DVD disc. If you start recording again any additional video will get recorded onto a new chapter.
You can fast-forward the VHS tape to another spot that you do want to record and press the “Dubbing” button again.
Finalize The DVD Disc
Finalizing the DVD disc is the least-obvious step in this whole process but will ensure your disc is playable on other devices like computers and other DVD players.
When you first start recording onto a disc there is an area of it where the table of contents is written. If this area is left “open” or not finalized it can be difficult for other players to read the disc.
The process of finalizing the disc essentially “closes” the table of contents, and tells the player there are no more sessions on the disc.
Once you finalize the disc in most cases you can no longer record to the disc if you wanted to add more information, but again there are exceptions.
Generally, if you let the DVD record until there is no more room left on it then most DVD recorders will auto-finalize the disc. But if you stop the recording/dubbing while there is still space left on the DVD then you’ll need to manually finalize the disc.
The process of finalizing the disc will vary by model, for example, here’s how to finalize a DVD disc on a Magnavox DVD recorder.
Label the DVD Disc
It’s important to keep track of what is recorded onto each DVD disc, so either get a sharpie and write on the disc or print a label.
You may also want to write something on the VHS tapes as well like “copied” or give it a checkmark or some indicator that you have processed the disc.
Test the DVD Disc in another Player
Just to be sure the DVD disc is recorded properly try playing it on another DVD player.
For this step you can use:
- a standalone DVD player
- a desktop or laptop computer with a disc drive
- a game system like Xbox or Playstation
Hopefully, you have a way to test the disc to make sure it plays ok.
Backup the DVD Disc
This is a step most people forget. They think they are done once their precious VHS memories are finally recorded to DVD.
The problem is that DVD discs are not indestructible. They can scratch, oxidize, and eventually become unplayable just like your VHS tapes.
You can create a backup of your DVD disc in a few different ways:
- create a copy of your DVD disc (meaning you’d now have 2)
- copy the contents of your DVD disc to a folder on your computer
- “rip” the DVD which means covert the entire video on the DVD disc into a single video file and store it on your computer
Option #3 of ripping the DVD is my favorite and can be done with a free media player called VLC.
Check out this video on how to download VLC and rip your DVD to a video file on Windows 10
Converting VHS to DVD with a DVD Recorder – Final Thoughts
Converting VHS to DVD with a DVD recorder is a simple way to convert your VHS to a digital format.
But a few parting words of advice:
- VHS tapes – if they are truly priceless memories don’t throw them away, store them safely in case you ever need to repeat this process
- Back up your DVDs – don’t take the step of copying your DVDs to your hard drive lightly.
- Back up your backups – I try to have a 2nd copy of everything on my computer stored on an external USB hard drive that I copy everything to monthly, and leave it unplugged when not used. The reason for this is I’ve also had a computer and drive lost because of a lightning strike next to my house